Sunday, December 18, 2011

Amazing Brownies

So I've totally been on this brownie kick lately. I mean seriously, been craving them everyday for the past two weeks. No, I'm not pregnant, I just really love chocolate and really want brownies! I usually make the same brownies every time and I am in love with them. Now that I know how to use my camera a little better I'll have to make them again and take pictures! I decided to venture out and make a different kind this time. I have probably about 20 different brownie recipes I'd like to try. I know, I'm insane when it comes to treats, but after all I did go to school to be a pastry chef! Love my sweets, even if they make me fat. :) Anyways, these brownies are super easy to make and you don't need a lot of ingredients. They're pretty amazing too of course. I found this recipe off one of my favorite blogs mybakingaddiction So many yummy treats on here to try!! You can always add walnuts or chocolate chips or any other mix ins if you want. I like brownies the way the are with out nuts, but it's your preference. If you love brownies make these now!!! I hope you enjoy them as much as I did!

Amazing Brownies
2/3 cup all-purpose flour
1/2 teaspoon salt
1/2 teaspoon baking powder
veg cooking spray
2 ounces unsweetened chocolate
4 ounces bittersweet or semisweet chocolate
10 tablespoons (1 stick plus 2 tablespoons) unsalted butter
1 1/4 cups sugar
2 teaspoons vanilla extract
3 large eggs

Preheat oven to 325. Line a 8x5 pan with parchment having a little overhang so that you can pull them out after baking. Spray with nonstick cooking or baking spray. Whisk dry ingredients and set aside. Melt chocolates and butter in double boiler. Stir chocolate so that it doesn't burn! Once melted, add sugar and stir, add in eggs, slowly, so not too cook them. Add in eggs separately mixing after each one. Add in vanilla. Add the dry to the wet and combine. Pour into baking dish and bake 35-45 minutes. Cool brownies for 15 minutes, and then pull out of the pan. Cool completely before enjoying, if you can! :)

Source: Amazing Brownies at My Baking Addiction


 Watch out they're addicting..and not diet friendly..or are they? ;)

Cinnabon Cinnamon Rolls

Okay so I've never actually had cinnabon's cinnamon rolls but they seem to be popping up everywhere and they do always look amazing. There's something about waking up on the weekend and enjoying some hot fresh cinnamon rolls. This is the second recipe I have tried and I enjoy both. I have many more to try! :) Since I'm usually just making them for my husband and I, I freeze the rest for the next couple weekends! I will say they are a little time consuming but well worth it! I hope you enjoy these!

Cinnabon Cinnamon Rolls

Yield: 12 large buns
Ingredients:
Dough
1 (1/4 ounce) package dry yeast
1 cup warm whole milk
1/2 cup granulated sugar
1/3 cup margarine (or 80% margarine 20% butter spread)
1 teaspoon salt
2 large eggs
3 1/4 cups all-purpose flour
3/4 cup bread flour
Filling
1 cup light brown sugar
3 tablespoons ground cinnamon
1/3 cup margarine (or 80% margarine 20% butter spread)
Method:
  • For the rolls, dissolve the yeast in the warm milk in a large bowl.
  • Add sugar, margarine salt, eggs, and flour, mix well.
  • Knead the dough into a large ball, using your hands dusted lightly with flour.
  • Put in a bowl, cover and let rise in a warm place about 1 hour or until the dough has doubled in size.
  • Roll the dough out on a lightly floured surface, until it is approx 21 inches long by 16 inches wide.
  • It should be approx 1/4 thick.
  • To make filling, combine the brown sugar and cinnamon in a bowl.
  • Spread the softened margarine over the surface of the dough, then sprinkle the brown sugar and cinnamon evenly over the surface, leaving about 1″ untouched around edges.
  • Gently roll into a fairly tight roll, trying to keep the filling inside.
  • With a sharp knife, slice into 12 pieces.
  • Place on parchment lined cookie sheet about 2″ apart, cover with lint-free cloth, and let rise for another hour.
  • Bake in 400 degree on rack just above center, for about 10 minutes, or until light golden brown.
  • Cool on cooling rack and gently place into airtight container when cool.
Icing:
4oz cream cheese
1/2 C margarine (1 stick)
1 3/4 C powdered sugar
1 tsp vanilla
1/8 tsp lemon flavor (preferably alcohol free)

Okay so this is where it gets somewhat time consuming..like I said before so worth it!
Remove the cream cheese and margarine from the refrigerator and place it into the mixing bowl. Leave it for about half an hour so that it will not be too cold.
Use the Flat Beater (or Paddle) to blend the cream cheese and margarine for 6 minutes. Use a speed of 65 RPM, or the “slow mixing” speed on your machine. I use setting #2 on my KitchenAid Mixer.
Switch to the Stainless Steel Whip and whip the cream cheese and margarine mixture for 10 minutes. Use a speed of 150 RPM, or the “medium fast whipping” speed on your machine. I use setting #6 on my KitchenAid Mixer.
Add 1 cup of the powdered sugar and mix for 1 minute using the Stainless Steel Whip at 65 RPM. Add the remaining 3/4 cup of powdered sugar and mix for an additional minute. Lastly add the flavorings and whip until combined. After pulling cinnamon rolls have cooled a bit but are still warm, ice away! Enjoy.


 These are definitely big cinnamon rolls. Big Amazing Butter Gooey cinnamon rolls that is!!!
 I enjoy lots of icing on mine :) Icing love!


Don't you just want to take a bite right now? 

Sunday, December 11, 2011

Trash the Dress

I've recently gotten married and I had an amazing wedding thanks to my Mama! When meeting with photographers I found this thing called a "trash the dress" shoot. Looked really awesome! I got married in a barn so by the time the night was over my dress was pretty dirty on the bottom..I decided this whole trash the dress thing was something I really wanted to do. I wanted more pictures of me in my dress too. I called the best photographer I know (she did my newlywed shots as well) and told her we had to do it. She's one of the sweetest people I have ever met and is truly amazing! It was her first too! Okay, so I didn't actually "trash" my dress just took some pretty awesome pictures! Enough said, time to share some of my favorites!


 Had to get a picture with my veil

 I just love the rocks here


This was such a super cool location. Thanks again to JordanQuinnPhotography!!! Please check out her blog sometime!

Photography by: JordanQuinnPhotography
As seen on: Lamb-Around:Not Baaad Sunday
                  Faded Charm Cottage

Thursday, December 8, 2011

Chix Tortilla Soup

It's the perfect time of year for soup! Sitting on the couch in sweats with a blanket and a nice bowl of soup sounds great. I made this soup awhile ago and really enjoyed it. Pretty simple to make as well. You can add other ingredients if you'd like too.

Chicken Tortilla Soup

6 (6-inch) corn tortillas, preferably a little old and dried out
1/4 cup grapeseed oil, or peanut oil
1/2 cup chopped onion
2 cloves garlic, minced
1 medium Anaheim, poblano or jalapeño chile, seeded, veins removed, chopped (Depending on the hotness and flavor desired. You can also mix chiles - 1 Anaheim and a half jalapeño.)
4 cups chicken broth or homemade chicken stock
1 can (14.5 oz) diced tomatoes, undrained (recommended Muir Glen fire-roasted)
1/2 teaspoon coarse salt (kosher or sea salt)
1 1/2 cups shredded cooked chicken
1 ripe avocado
1/2 cup (2 oz) shredded Monterey Jack cheese or cheese of your choice I like chihuahua
Chopped fresh cilantro
1 lime, cut into wedges

If using fresh tortillas, bake in the oven at 200 for 10-15 minutes. It's best to start with tortillas that don't have as much moisture so if you can dry them out. Cut tortillas in half and then cut into strips. Heat oil over medium-high heat and fry strips in three batches until brown and crisp. Transfer to a plate lined with paper towels.

Add the chopped onions to the pan, cook 2 minutes, stirring frequently. Add the chopped chile and cook for 2-3 minutes more, until the onions and chiles have softened. Add the garlic and cook for 30 seconds more. Add the broth, tomatoes, and salt. Increase the heat to high, heat until the soup begins to boil, then reduce the heat to a low simmer, cover and simmer for 15 minutes. Add the shredded chicken and cook until heated through.

Serve with cheese, avocado, cilantro and tortilla strips. You can always add beans and corn to this recipe as well but I love it the way it is! Hope you enjoy!


 Okay, I didn't fry my own strips (my tortillas were stale)

As seen on: lifeasmom

Tuesday, December 6, 2011

Reese's 1st Birthday Party

This post is long over due..baby Reese's birthday was a few weeks ago! Reese is the adorable little girl I nanny for and when her parents came to me asking if I'd make her first birthday cake I was thrilled. It had been awhile since I made a birthday cake so I was definitely looking forward to it. I'll have to thank my pastry arts and cake decorating background for all my help with this cake. I made a two tiered cupcake cake and cupcakes. I'm known for going overboard, but hey it's the perfect opportunity! So I decided to make chocolate cake, yellow cake, cookies n cream cupcakes and red velvet cupcakes! I found the most beautiful looking piece of cake on Sweetapolita's blog. Just amazing check it out. Not only does it look good it tastes good!! I had so many compliments on this cake. And the swiss meringue buttercream..will put you in heaven. One of my favorite frostings to make. Just don't tell people how much butter and sugar is in there. It's to die for! I love tall cakes so I made many layers, plus it looks pretty when sliced! I'm always looking for the next best red velvet recipe and I just can't find it. My husband reminded me the other day that I never like red velvet whenever I have it..but I do!! I just don't know who has it. I've made many recipes and they  never excite me. I know I'm a tough critic when it comes to sweets but that's a good thing! I'm picky, what can I say? I'm a food snob! On to cookies n cream, so delish! My perfect description of cookies n cream, white cake with cookies and cookies in the frosting as well! Thanks to Annie over at Annie's Eats..she's got one of my all time favorite blogs. I can usually trust her blog for..well, anything! I've never been disappointed! I made baby Reese a smash cake as well and she dug right in...for quite some time! Mommy even had to give her a bath afterwards! I'd rather have had her make a huge mess then cry! :)  I'm glad she enjoyed it and had a good time! She's grown so fast and I miss holding her in my arms! Love you Reese!!
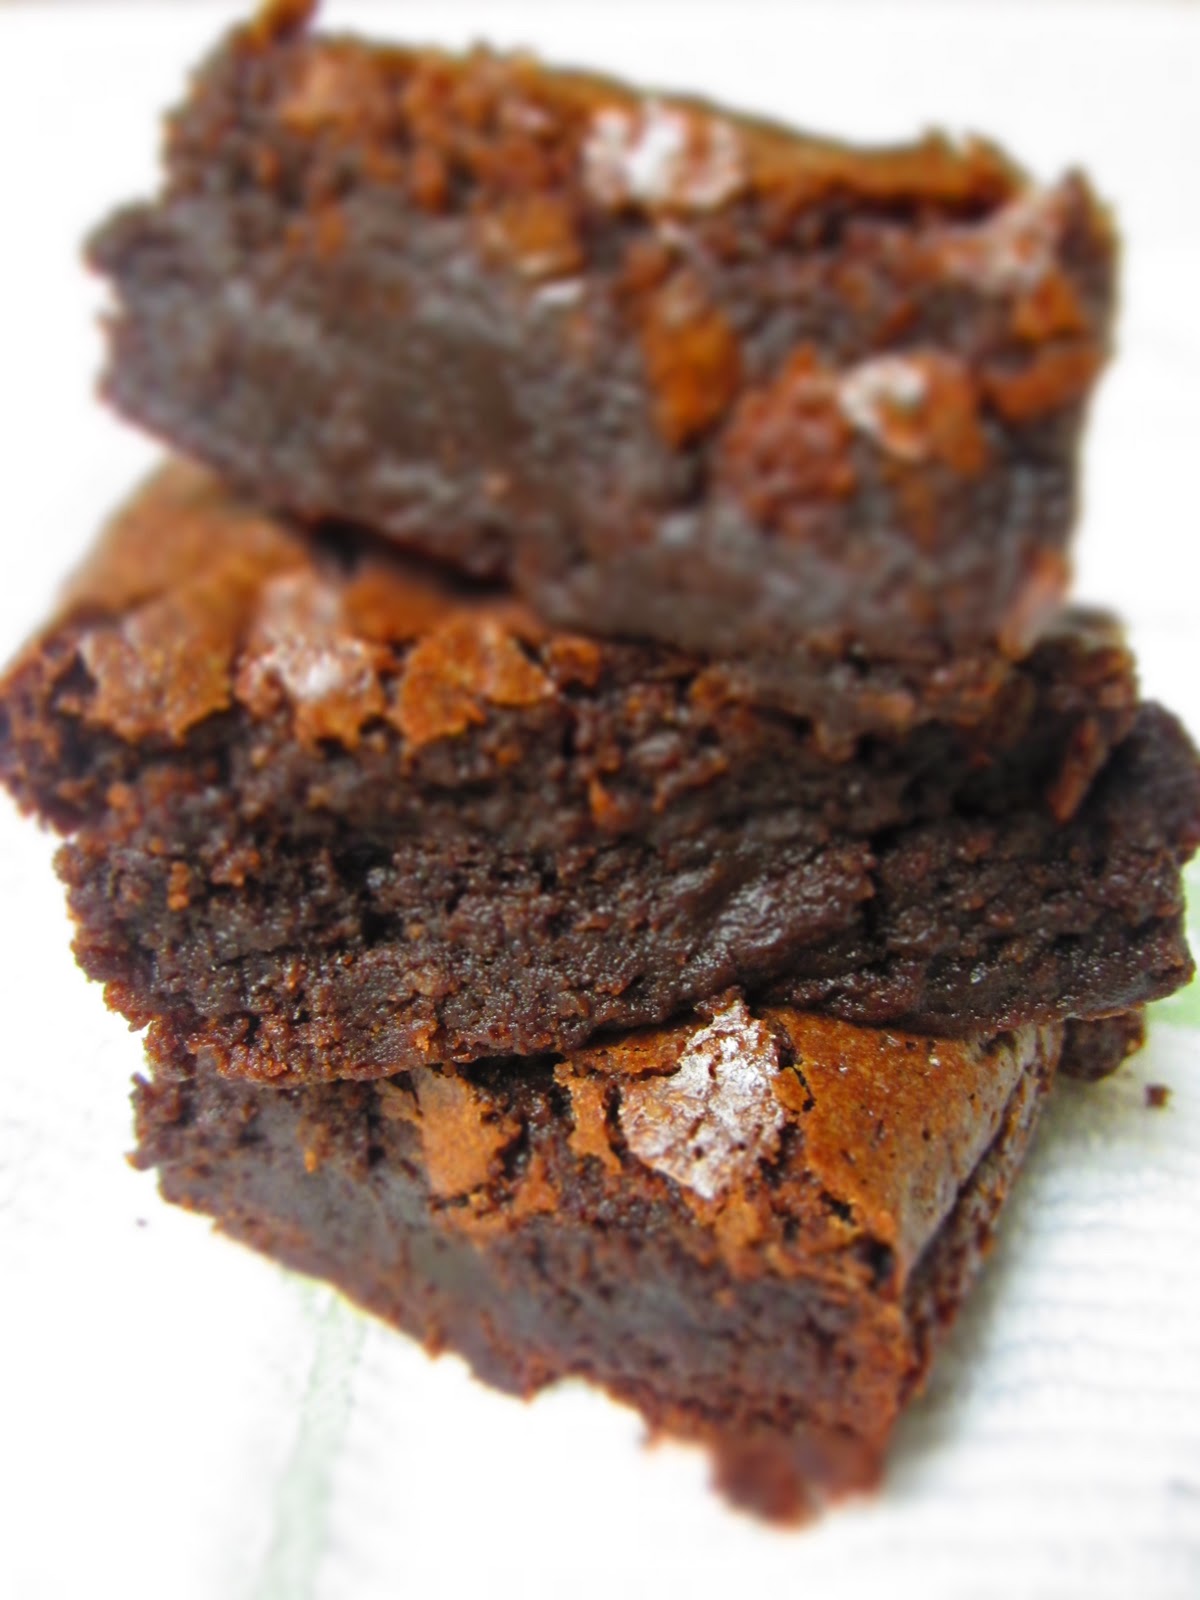
 The cake
 The smash cake
 Big bro Declan helping blow out the candles
 Cake!

 I'm the birthday girl!
 Yum!
 Can you tell she likes it?

Priceless!


Rich and Dark Chocolate Cake
1 3/4 cups all-purpose flour
2 cups granulated sugar
3/4 cup cocoa powder-extra dark (I used dutch processed cocoa powder)
2 teaspoons baking soda
1 teaspoon baking powder
1 teaspoon salt
2 eggs
1 cup strong black coffee (can be hot)
1 cup buttermilk, room temperature
1/2 cup vegetable oil
1 tablespoon pure vanilla extract

Preheat oven to 350.  Prepare 2 x 9″ (or 3 x 8″ for slightly shorter layers) cake pans with butter and flour or parchment paper. In bowl of electric mixer, sift all dry ingredients. Add all remaning ingredients to bowl with the dry ingredients and with paddle attachment on mixer, mix for 2 minutes on medium speed (you may need the plastic splashguard that comes with mixer) and pour into prepared pans. Batter will be liquidy. 

Bake for 20 minutes and rotate pans. Check cakes for doneness around 30 or 35 minutes. Toothpick should come out clean. Do not overbake!  Cool on wire racks for 20 minutes then gently invert onto racks until completely cool. 

I doubled this recipe and made a 5 layer cake. The layers are thin, you can make them thicker and have less layers. All depends on your likings! I had a 6th layer and froze it. I didn't want it to be awkwardly tall!

Source: Rich and Dark chocolate cake


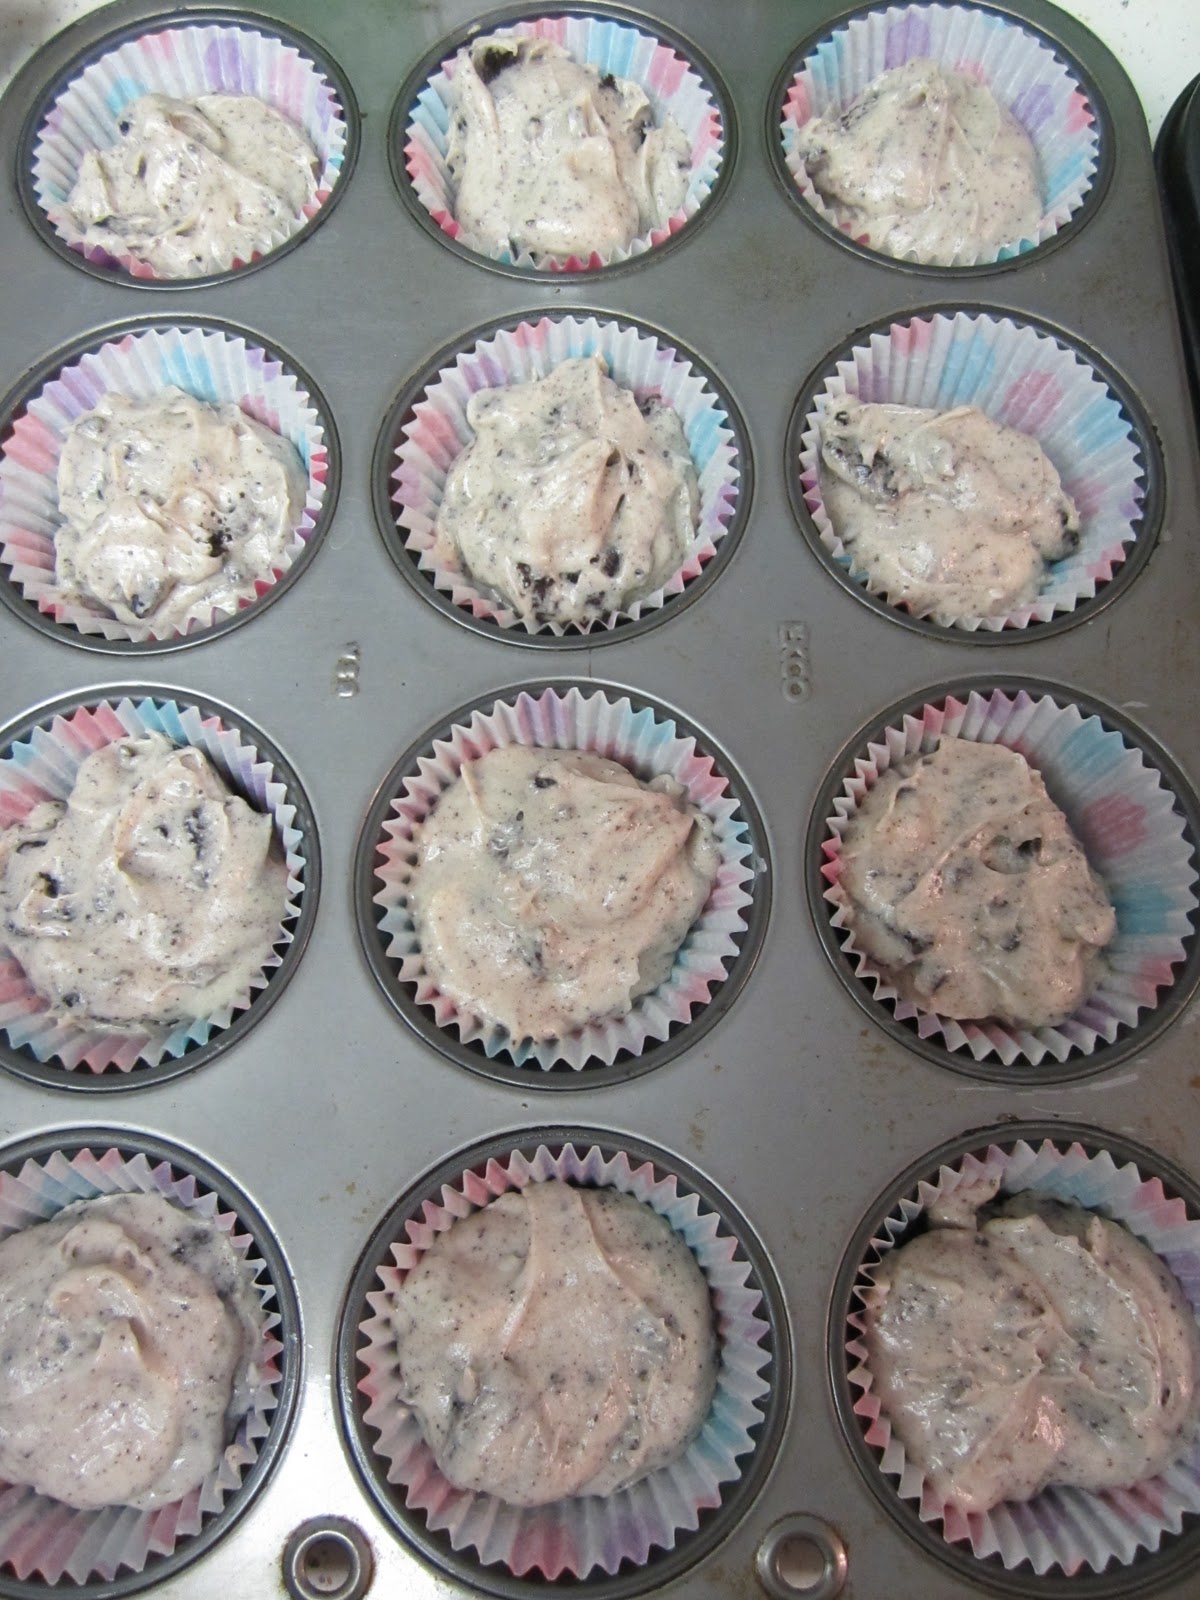
Cookies n Cream Cupcakes:
Yield: 24 cupcakes
For the cupcakes:
24 Oreo halves, with cream filling attached
2¼ cups all-purpose flour
1 tsp. baking powder
½ tsp. salt
8 tbsp. unsalted butter, at room temperature
1 2/3 cup sugar
3 large egg whites, at room temperature
2 tsp. vanilla extract
1 cup milk
20 Oreo cookies, coarsely chopped (Annie quarrters them)

For the frosting:
8 oz. cream cheese, at room temperature
6 tbsp. unsalted butter, at room temperature
1 tbsp. vanilla extract
4 cups confectioners’ sugar, sifted
2 tbsp. heavy cream

For garnish:
Oreo cookie crumbs
24 Oreo cookie halves


Preheat oven to 350. Line cupcake pans with cupcake liners. You'll need 24.  Place an oreo halve in the bottom of each liner, cream side up.  In a medium bowl, combine the flour, baking powder and salt; stir together with a fork to blend and set aside.  In the bowl of an electric mixer, combine the butter and sugar and beat together on medium-high speed until light and fluffy, about 2 minutes.  Blend in the egg whites one at a time, beating well after each addition.  Blend in the vanilla extract.  With the mixer on low speed, beat in half of the dry ingredients just until incorporated.  Add the milk and beat just until combined, then mix in the remaining dry ingredients.  Gently fold in the chopped oreos with a rubber spatula until evenly incorporated. Do not over mix.

Divide the batter into the liners. Bake 18-20 minutes rotating halfway between baking time.


To make the frosting, combine the cream cheese and butter in the bowl of an electric mixer and beat on medium-high speed until smooth, about 1 minute.  Blend in the vanilla extract.  Beat in the confectioners’ sugar until incorporated and smooth, 1-2 minutes.  Add the heavy cream to the bowl and beat on medium-low speed just until incorporated, then increase the speed to medium-high and whip for 4 minutes until light and fluffy, scraping down the sides of the bowl as needed.
Frost the cooled cupcakes as desired.  Sprinkle with oreo crumbs and garnish with oreo halves.

Source: Cookies n Cream Cupcakes


Related Posts Plugin for WordPress, Blogger...